-
 nicolekueffer
Guten Tag
Ich habe versucht mein Jotform mit meinem entsprechenden Excel zu verbinden, damit eine automatische Aktualisierung erfolgt, wenn es eine neue Anmeldung gibt. Allerdings kann ich nur das Worksheet auswählen, das Register, die Tabelle und der speichern Button sind nicht anwählbar.
Ich habe bereits mit Podo versucht herauszufinden, woran das liegen kann. Leider habe ich alle möglichen Probleme geprüft und es hat nicht an denen gelegen -> Muss auch als Excel gespeichert sein auf Sharpoint, und als Tabelle formatiert,...
Warum kann ich mein Excel nicht verbinden?
Liebe Grüsse
Nicole

-
 Podo: Support Specialist
Hallo Nicole,
Vielen Dank, dass Sie sich an den Jotform Support gewandt haben. Ich bin ein KI-Assistent und helfe Ihnen gerne weiter.
Es klingt so, als ob die direkte Verbindung zu Ihrer bestehenden Excel-Datei auf SharePoint aktuell nicht wie gewünscht funktioniert. In Jotform können Sie neue oder bestehende Excel-Tabellen über Zapier anbinden, sodass neue Formular-Einreichungen automatisch in Ihre Excel-Datei geschrieben werden.
Ich zeige Ihnen, wie Sie Ihre Formulareinreichungen über Zapier an ein bestehendes Microsoft Excel-Sheet senden können:
Schritte in Jotform Form Builder
- Klicken Sie auf Settings in der orangefarbenen Navigationsleiste oben im Form Builder.
- Gehen Sie zu Integrations auf der linken Seite.
- Suchen Sie nach Excel und klicken Sie auf Microsoft Excel.
Zapier-Verbindung starten
- Klicken Sie auf Use This Zap neben Add New Jotform Submissions to Excel Spreadsheet Rows im Bereich Zapier Templates.
- Klicken Sie auf Log In, melden Sie sich in Ihrem Zapier Account an und senden Sie in einem anderen Tab eine Test-Einreichung über Ihr Formular.
- Klicken Sie im Jotform-Teil des Zaps unter Test auf Test Trigger, damit Zapier diese Test-Einreichung findet.
- Wählen Sie die gefundene Einreichung aus und klicken Sie auf Continue With Selected Record.
Excel-Datei und Arbeitsblatt auswählen
- Melden Sie sich im Microsoft-Teil des Zaps unter dem Tab Setup in Ihrem Microsoft Account an und klicken Sie auf Continue.
- Wählen Sie unter dem Tab Configure im Feld Spreadsheet Ihre bestehende Excel-Datei.
- Wählen Sie im Feld Worksheet das Arbeitsblatt, in das die Daten geschrieben werden sollen.
- Scrollen Sie nach unten, ordnen Sie die Spalten Ihrer Excel-Tabelle den entsprechenden Formularfeldern zu und klicken Sie auf Continue.
Integration testen und aktivieren
- Klicken Sie unter dem Tab Test auf Test Step, damit die Test-Einreichung in Ihre Excel-Datei geschrieben wird, und prüfen Sie das Ergebnis in Excel.
- Klicken Sie anschließend auf Publish, um den Zap zu aktivieren.
Ab jetzt werden alle neuen Einreichungen automatisch in die verbundene Excel-Datei und das gewählte Arbeitsblatt übertragen:
Wenn Sie mir einen Screenshot von der Stelle schicken, an der bei Ihnen nur das Worksheet, aber nicht Tabelle/Register und Speichern auswählbar sind, können wir danach gezielter schauen, ob es sich um eine Einschränkung dieser direkten Verbindung handelt und ob Zapier für Ihren Anwendungsfall die passende Alternative ist.
Probieren Sie es aus und lassen Sie uns wissen, wie es läuft.
-
 Keenly Jotform Support
Hi Nicole,
While we do offer Support in many foreign languages, and we're working hard to add more every day, we don't currently have German Support agents who can help you. So I'll try to help you in English using Google Translate, but you can reply in whichever language you feel comfortable using.
Now, coming back to your question, it seems you’re setting up an Add Row to Existing Table action for the Microsoft Excel integration. Could you choose a worksheet from the Worksheet section and a table from the Table section, then see if that helps?
If the worksheet has an existing table, you should be able to select it in the Table section and save the integration as usual. If the issue persists, you can send us a short screen recording of the steps you’re taking. This will help us pinpoint the issue. Loom, Google Drive, or Dropbox links all work fine.
Once you get back to us, we can take the next step toward solving this.
-
nicolekueffer
Hi Keenly
Thanks for your response. English is no problem. To my question and your assumption "it seems you’re setting up an Add Row to Existing Table action for the Microsoft Excel integration" that is exactly right. That's what I was trying to do.
I can choose my workbook (so login to my account has worked, I don't think it should be a privacy setting issue or something like that) However, afterwards, it doesn't let me klick on the Worksheet drop down or the table drop down or the save button.
Could it be a bug in the platform?
Best, Nicole
-
nicolekueffer
And here a quick video of my issue: https://www.loom.com/share/4cddc650fd76495ca24738518dc4e52e
-
 Joeni Jotform Support
Hi Nicole,
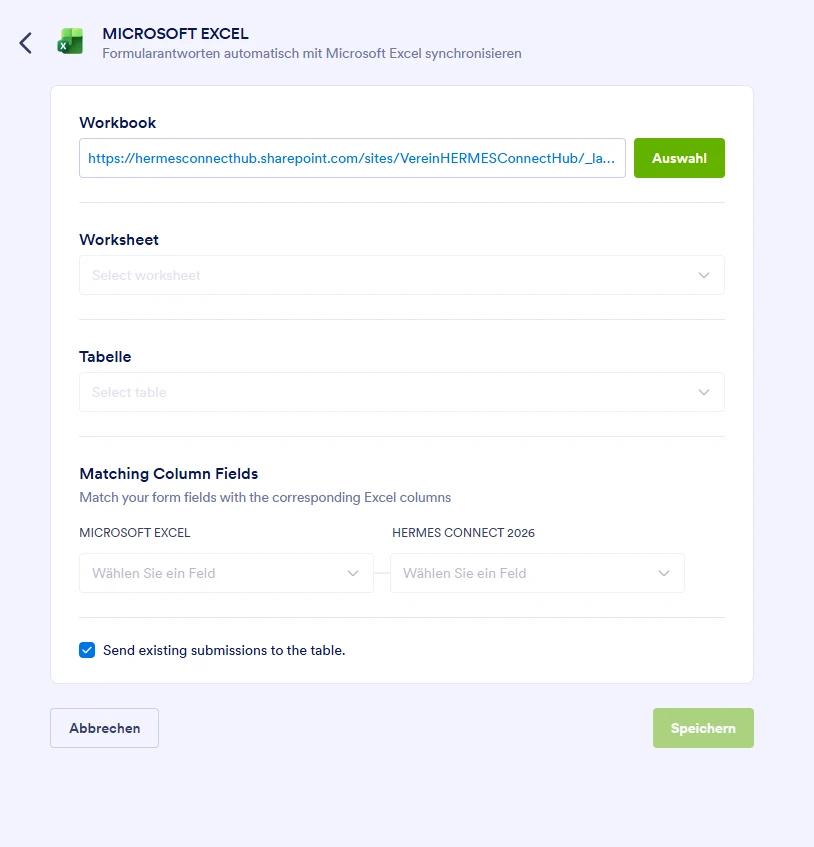
I cloned your form to test the issue, but I was able to set up the Worksheet and Table section in the Microsoft Excel integration without any issue. Take a look at the screenshot below:
Could you check your existing workbook to see if a worksheet and table have been added? If they have and the same issue occurs, can you send us a screenshot of your browser’s console report while the issue is happening so we can take a closer look? Here’s how to get them in Chrome:1. On the page where you’re having the issue, click on the Three Dots icon in the top-right corner of the Chrome browser.
2. Then, in the menu that opens on the right side of the page, hover your mouse over More Tools.
3. Next, in the menu that opens, click on Developer Tools.
4. Now, in the Developer Tools window, click on the Console tab and then take a screenshot of everything you see there.
After taking a screenshot of the console log, the next step is to post it in the Help Center. Here’s how to get going:
1. On the Help Center page, scroll down to the Your Answer section and click on the Image icon.
2. Drag and drop your image into the Upload box, or click on it and select your file.
3. Then, click on the Add button in the bottom-right corner of the window.
4. To resize it, click on your screenshot and then click on one of the boxes in the corners, and drag it inward.
5. Once you're finished, click on the Post Answer button at the bottom right of the Your Answer section.
That's it. Once we hear back from you, we can help you sort this out.


 Could you check your existing workbook to see if a worksheet and table have been added? If they have and the same issue occurs, can you send us a screenshot of your

Your Reply
Something Went Wrong
An error occurred while generating the AI response. Please try again!