Jotform’s Stripe integration makes it easy to accept online payments. Whether you’re selling products, collecting donations, or offering subscriptions, you can integrate your form with Stripe and start getting secure payments in just a few clicks. With Stripe, your customers can pay using credit cards, debit cards, or digital wallets like Apple Pay and Google Pay—all without leaving your form.
Setting Up the Stripe Integration (Legacy Method)
Whether you’re creating a new form or updating an existing one, adding and setting up the Stripe payment field using the Legacy Method is simple—here’s what to do:
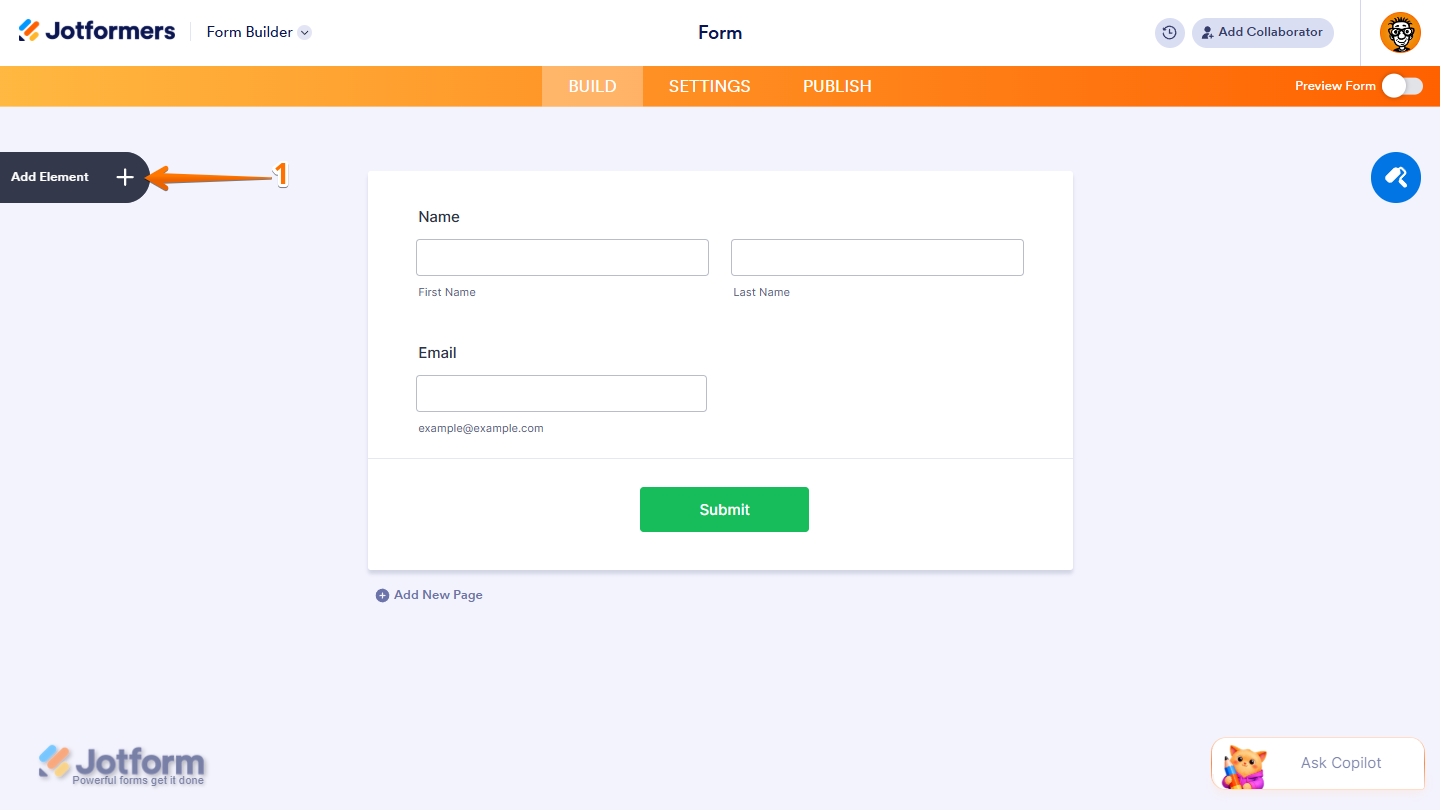
- In Form Builder, click on Add Element on the left side of the page.
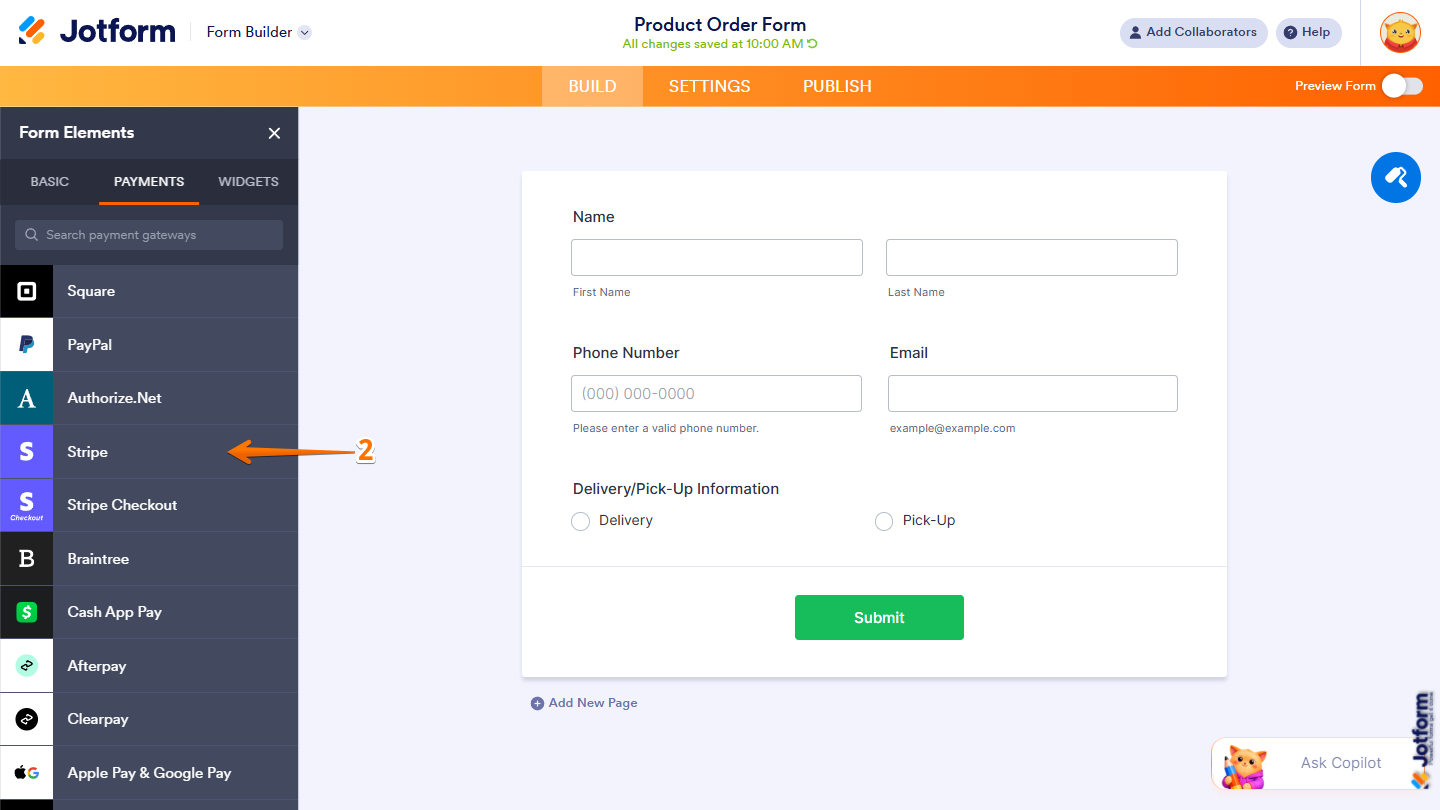
- Now, in the Form Elements menu, under the Payments tab, click on Stripe to add it to your form. Or just drag and drop it to where you want it on your form.

- Next, in the Stripe Integration menu that opens on the right side of the page, click on the Downward Arrow icon on the right side of the Mode Dropdown menu and select one of these options:
- Live Mode — Use this when you’re ready to collect real payments. Customers will be charged, and the funds will be deposited into your Stripe account.
- Test Mode — Use this to test your setup before going live. You can run test payments using your Sandbox account or test cards, and no actual charges will be made.
- After selecting a mode, click on Connect and, in the pop-up window that opens, log in to your Stripe account.

- Then, click on the Downward Arrow icon on the right side of the Currency dropdown and select the currency you want to use from the Dropdown menu that opens. For example, USD United States Dollar. Check out Stripe’s guide on Supported Currencies to learn more.

- Now, in the middle part of the Stripe Integration menu, configure these things:
- Debit or Credit Card — Toggled on by default. Stripe integration lets you accept payments from either a debit or a credit card.
- Enable 1-Click Checkout with Link — When enabled, this lets your customers autofill their payment information through Link. You’ll find more info in our guide on Making Payments with Link.
- ACH Bank Transfer — Toggle this on to accept payments through ACH Bank Transfer. Take a look at our guide on How to Accept ACH Payments on Your Form Using Stripe for more details.
Notes
- Link works with both Debit/Credit Card and ACH Bank Transfer payment options.
- If ACH Bank Transfer is enabled, you can disable the Debit/Credit Card option to accept payments exclusively through bank transfers.
- After that, click on Downward Arrow icon on the right side of the Payment Type dropdown and in the Dropdown menu that opens, select what you’d like the payment to be processed for. Here are the details for each option:
- Sell Products — This is selected by default. Use this to sell physical or digital goods at a fixed price, allowing customers to make a one-time purchase.
- Sell Subscriptions — Use this to charge customers on a recurring basis for services, memberships, or other ongoing access.
- User-Defined Amount — This lets customers enter the amount they want to pay. It’s useful for tipping, custom amount pricing, or flexible payments.
- Collect Donations — Select this to accept voluntary contributions, commonly used for fundraising, nonprofit support, or charitable causes.

- If you selected Sell Products or Sell Subscriptions, click on Continue at the bottom and then start adding your products or subscriptions.

- But if you selected User Defined Amount or Collect Donations, click on Save at the bottom.

Looking for more info when setting up your products or subscriptions? Check out these helpful guides for more details:
- Setting Up Your First Order Form
- How to Set Up a Recurring Payment
- How to Add Options to Payment Form Products
- How to Add a Coupon Code to Payment Forms
- How to Apply Sales Tax to Products on Your Payment Form
- How to Add Shipping Costs to Payment Forms
- How to Generate an Invoice for Your Payment Form
- How to Enable and Manage Product Stocks in Payment Fields
Configuring the Additional Gateway Settings
When you expand the Additional Gateway Settings section of the Stripe Integration window, you’ll see some options you can modify based on the payment type you chose. Here’s how to set it up:
- In the Stripe Integration menu on the right side of the page, scroll to the bottom and click on Additional Gateway Settings.
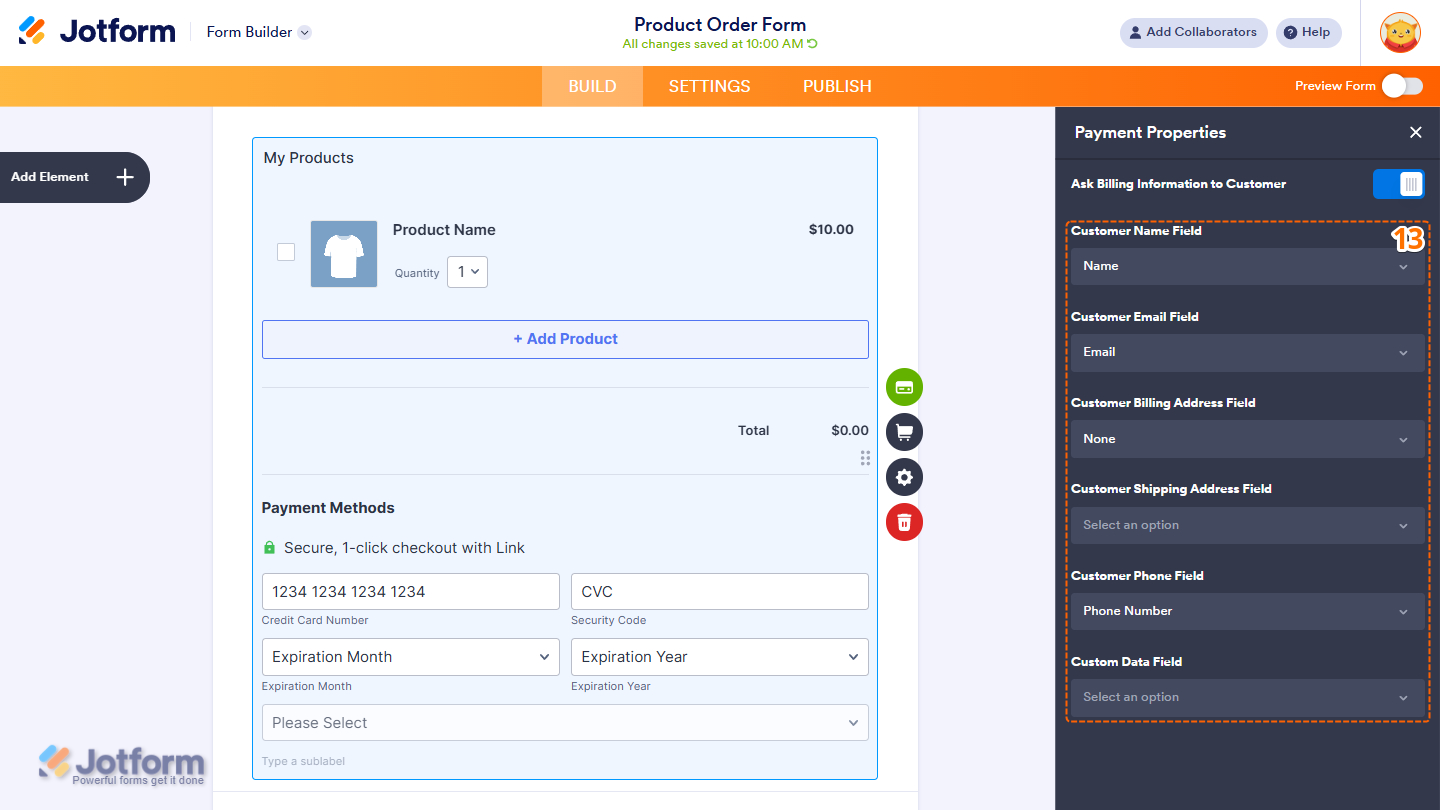
- Then, optionally toggle on the Ask Billing Information to Customer to ask for the following information:
- Customer Name Field — Select a field, preferably the Full Name element, to send the customer’s name to Stripe.
- Customer Email Field — Pick an Email field to include your customer’s email address in the billing details.
- Use Field as Billing Address — Select an Address field to send your customer’s billing address to Stripe as billing information.
- Use Field as Shipping Address — Select an Address field to send the Shipping address of your customer to Stripe as Shipping information.
- Customer Phone Field — Select a Phone field to pass along your customer’s phone number to Stripe.
- Custom Data Field — Select a Short Text field or a Unique ID widget to include any custom data in the billing info.

- Next, optionally configure the following:
- Send Email to Customer — Toggle this on if you want Stripe to send a receipt to your customer after payment
- Show Total Price on the Form — This is only available with the Sell Products payment type and is enabled by default. You can toggle this off to hide the total price of selected products on your form.
- Users Can Select Multiple Products — This feature is available only with the Sell Products payment type and is enabled by default. You can toggle this off if you want customers to select only one (1) product per submission.
- Create Stripe Customer Record — Creates a customer record in Stripe for the submission.
- Charge Customer Immediately — Charges the customer right away after submission.
- Clickable Image Preview — This is only available with the Sell Products and Sell Subscriptions payment types and is enabled by default. You can toggle this off to prevent customers from enlarging product or subscription images.
- Show Decimals on the Form — This is only available with the Sell Products and Sell Subscriptions payment types and is enabled by default. You can toggle this off to hide decimals on both the item prices and the total amount.
- Decimal Separator — When decimals are displayed in your payment field, you can select between a period (used in English-speaking countries) and a comma (used in many European countries).

Note
When you turn off Charge Customer Immediately to use the Charge Later feature, be sure to keep Create Stripe Customer Record enabled. This creates a customer ID along with the approved payment method ID, which is required to capture payments later with the Charge Customer Now button in Tables.
- When you select Sell Subscription from the Payment Type Dropdown menu, you can optionally set up these things:
- Fetch Coupons from Stripe Account — When enabled, this option retrieves and displays all coupons from your connected Stripe account. It overrides any coupons you created directly in Jotform. Take a peek at our guide on How to Fetch Coupon Codes From Stripe to learn more.
- Fetch Subscriptions from Stripe Account — Toggle this on to pull your subscription items directly from your Stripe account.
- Show Fetched Coupons from Stripe Account — This option becomes available and is enabled by default when you turn on Fetch Coupons from Stripe Account. It lets you view fetched coupon codes directly in the Coupons tab of the Subscription Settings menu.

That’s it for configuring the Additional Gateway Settings. Click on Continue or Save based on the payment type you’ve selected.
Setting Up the Stripe Integration (Reusable Payment Connections Method)
Reusable Payment Connections lets you set up Payment Processor Integrations, such as Stripe, once with the same payment gateway credentials and configuration, and use them across different assets in your account, such as Forms and Apps.
Whether you are creating a new form or updating an existing one, you can add a payment field and set up a Stripe Reusable Payment Connection in just a few easy steps. Here’s how to do it:
- In Form Builder, click on Add Element on the left side of the page.

- Now, in the Form Elements menu, under the Payments tab, click on Stripe to add it to your form. Or just drag and drop it to where you want it on your form.
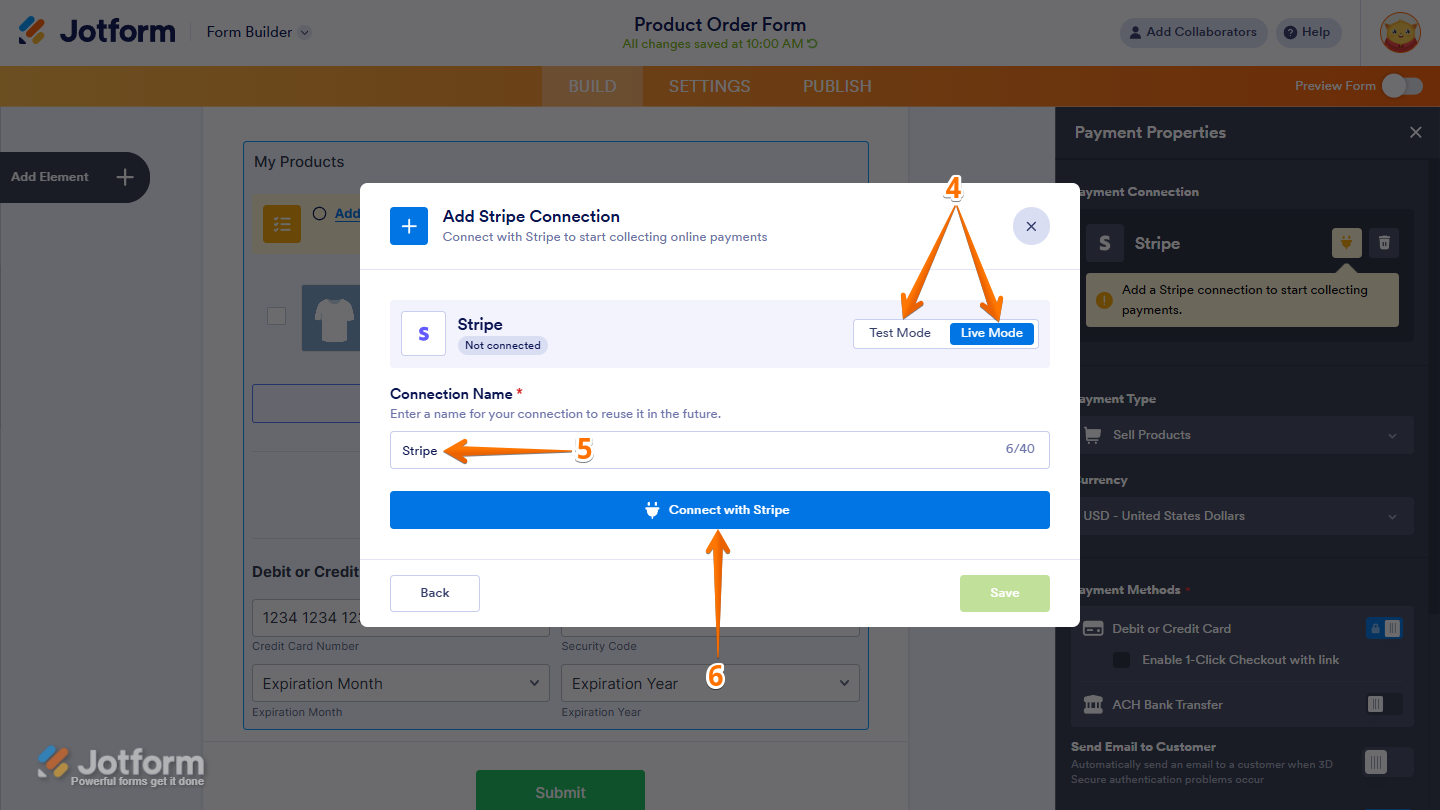
- Then, in the Payment Properties menu that opens on the right side of the page, in the Payment Connection section, click on the Plug icon to use a Reusable Stripe Payment Connection.

- Now, in the Add Stripe Connection window, click on Test Mode or Live Mode at the top to select which environment you’re adding a payment connection for.
- Next, enter a name in the Connection Name field.
- Now, click on Connect with Stripe and log in to your Stripe Account.
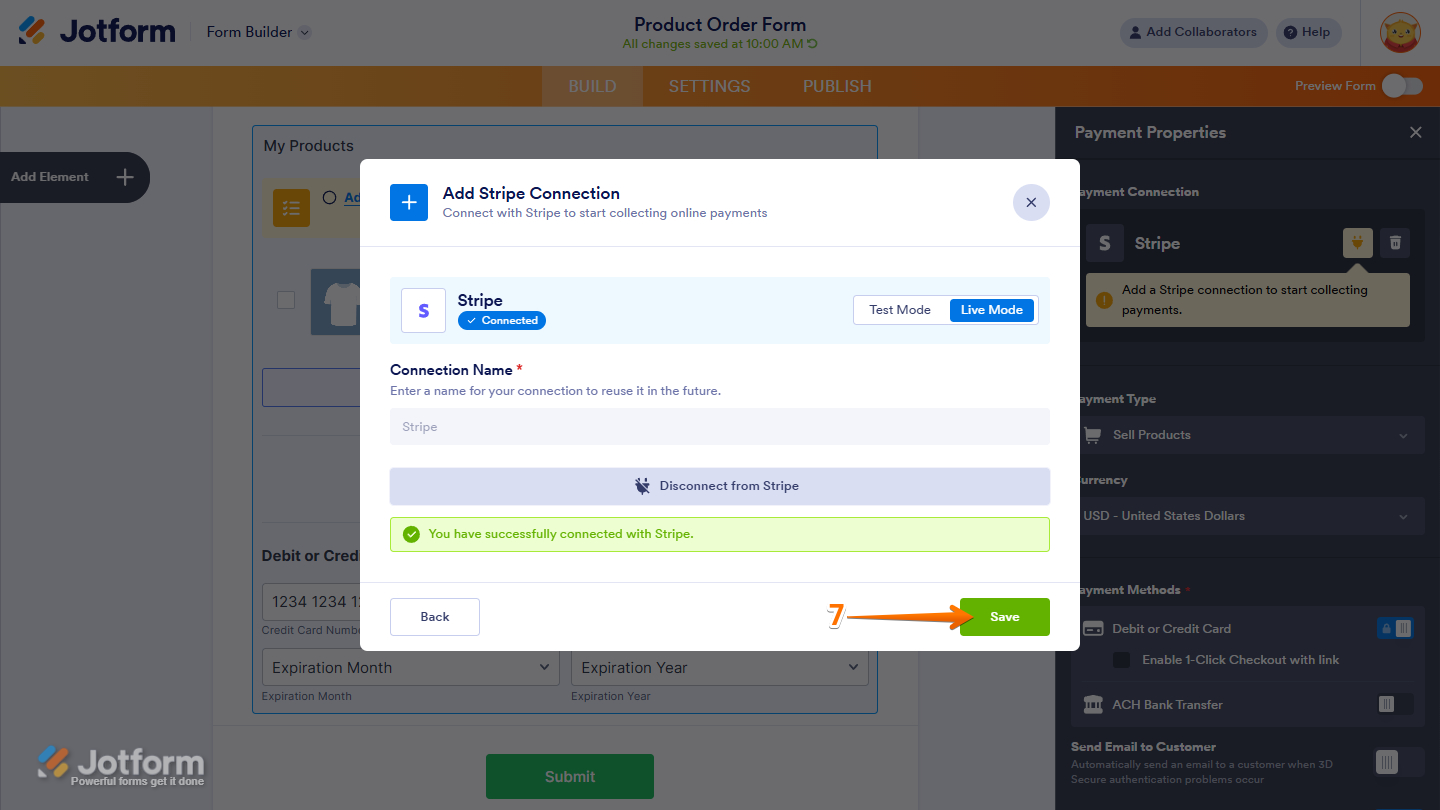
- Once it is successfully connected, click on Save at the bottom to add the reusable payment connection to your account.
- Now, in the Payment Connections window, click on the Stripe payment connection you’ve just added to select it, and then click on Use at the bottom.

- In the Payment Properties window on the right side of the page, click on the Downward Arrow icon on the right side of the Payment Type dropdown and select the option you’d like the payment to be processed for from the Dropdown menu that opens. Here are the details of the options you can choose from:
- Sell Products — This is selected by default. Use this to sell physical or digital goods at a fixed price, allowing customers to make a one-time purchase.
- Sell Subscriptions — Use this to charge customers on a recurring basis for services, memberships, or other ongoing access.
- User-Defined Amount — This lets customers enter the amount they want to pay. It’s useful for tipping, custom amount pricing, or flexible payments.
- Collect Donations — Select this to accept voluntary contributions, commonly used for fundraising, nonprofit support, or charitable causes.

- Then, click on the Downward Arrow icon on the right side of the Currency dropdown and select the currency you want to use from the Dropdown menu that opens. Check out Stripe’s guide on Supported Currencies to learn more.

- Next, in the middle part of the Stripe Payment Properties menu, configure these things:
- Debit or Credit Card — Toggled by default. Stripe integration lets you accept payments from either a debit or a credit card.
- Enable 1-Click Checkout with Link — Link lets you save and autofill your payment information for your next purchases on Link-enabled sites. You’ll find more info in our guide on Making Payments with Link.
- Send Email to Customer — Automatically email the customer when 3D Secure authentication issues occur during form submission.
- Charge Customer Immediately — Stripe supports Payment Authorization. Toggle this off if you want to charge customers later. You’ll find more info in our guide on How to Enable Payment Authorization.
- Create Stripe Customer Record — Create a Stripe customer for the submission so payment methods and customer data are saved in Stripe. You can select from the two options:
- Each Unique Customer — Create one Stripe customer per unique customer (identified by email or customer ID). Prevents duplicate customer records.
- Each Submission — Create a new Stripe customer for every submission, even if the same person submits multiple times.

Notes
- Link works with both Debit/Credit Card and ACH Bank Transfer payment options.
- If ACH Bank Transfer is enabled, you can disable the Debit/Credit Card option to accept payments exclusively through bank transfers. However, the Debit/Credit Card option cannot be disabled while Link is enabled.
- When you turn off Charge Customer Immediately to use the Charge Later feature, be sure to keep Create Stripe Customer Record enabled. This creates a customer ID along with the approved payment method ID, which is required to capture payments later with the Charge Customer Now button in Tables.
- When you select Sell Subscription from the Payment Type Dropdown menu, you can optionally set up these things:
- Fetch Coupons from Stripe Account — When enabled, this option retrieves and displays all coupons from your connected Stripe account. It overrides any coupons you created directly in Jotform. Take a peek at our guide on How to Fetch Coupon Codes From Stripe to learn more.
- Fetch Subscriptions from Stripe Account — Toggle this on to pull your subscription items directly from your Stripe account.
- Show Fetched Coupons from Stripe Account — When Fetch Coupons from Stripe Account is enabled, this will show up to decide whether to display the coupons when you enable the option to fetch them from Stripe.

- Then, optionally toggle on the Ask Billing Information to Customer to ask for the following information:
- Customer Name Field — Select a field, preferably the Full Name element, to send your customer’s name to Stripe.
- Customer Email Field — Select an Email field to pass your customer’s email address to Stripe for billing and payment records.
- Customer Billing Address Field — Select an Address field to send your customer’s billing address to Stripe as billing information.
- Customer Shipping Address Field — Select an Address field to send your customer’s shipping address to Stripe as shipping information.
- Customer Phone Field — Select a Phone field to send your customer’s phone number to Stripe.
- Custom Data Field — Select a Short Text field or a Unique ID widget to include any custom data in the billing info.
That’s it for setting up a Stripe Reusable Payment Connection. Now, if you’re looking for more info when setting up your products or subscriptions, check out these helpful guides for more details:
- Setting Up Your First Order Form
- How to Set Up a Recurring Payment
- How to Add Options to Payment Form Products
- How to Add a Coupon Code to Payment Forms
- How to Apply Sales Tax to Products on Your Payment Form
- How to Add Shipping Costs to Payment Forms
- How to Generate an Invoice for Your Payment Form
- How to Enable and Manage Product Stocks in Payment Fields
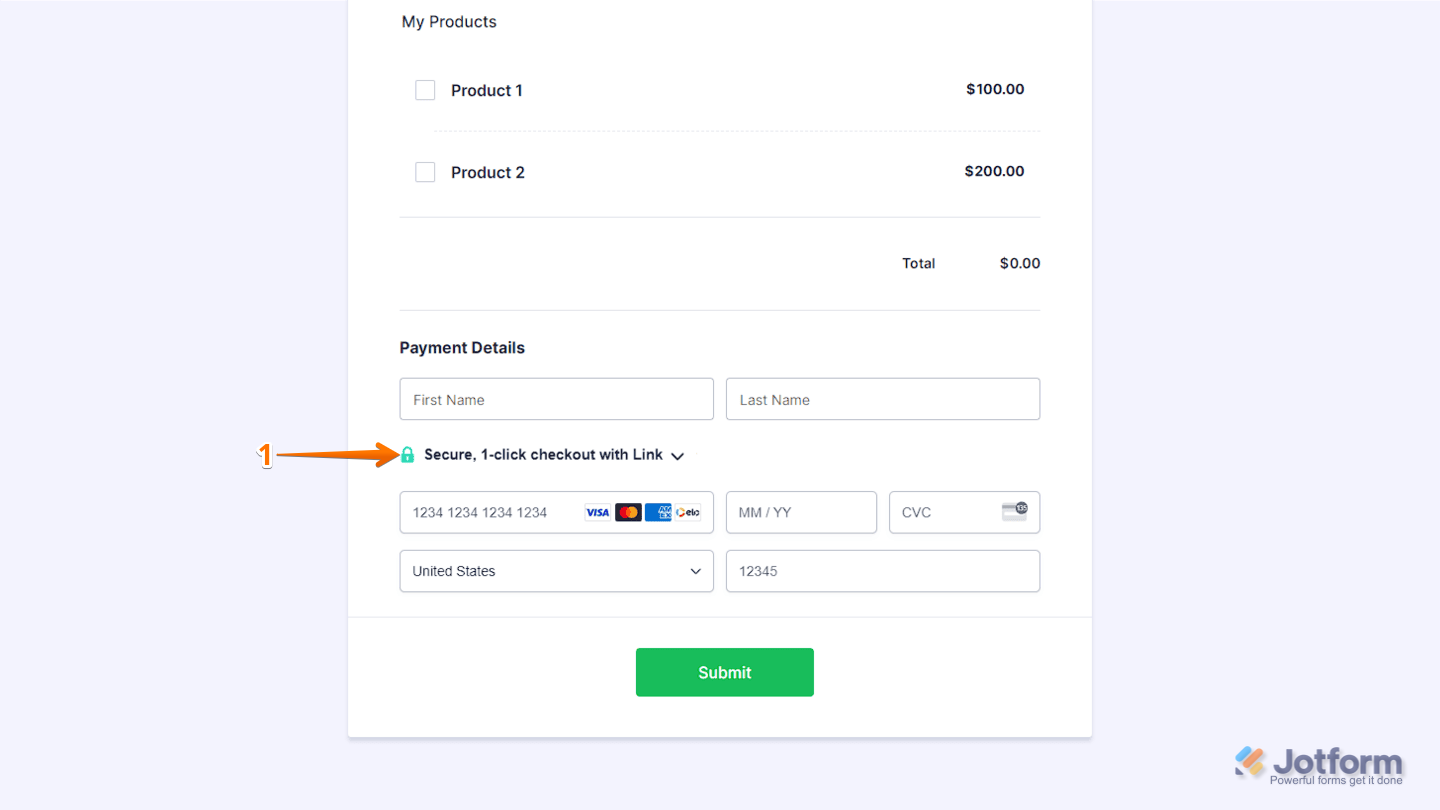
Making Payment With Link
Link works like MasterPass. It lets you save your credit card details and use them across other Link-enabled websites without re-entering your card information. To pay, simply enter your registered Link email address, verify it via SMS or email, and complete the purchase using your saved payment details. This is how it’s done:
- Click on Secure, 1-click Checkout with Link.
- Link will automatically check whether your email address is already registered or if you need to create a new account. If you’re not yet registered, you’ll be asked to provide additional details such as your phone number, full name, and card information. You’ll need to submit the form to complete your payment and set up your Link account.
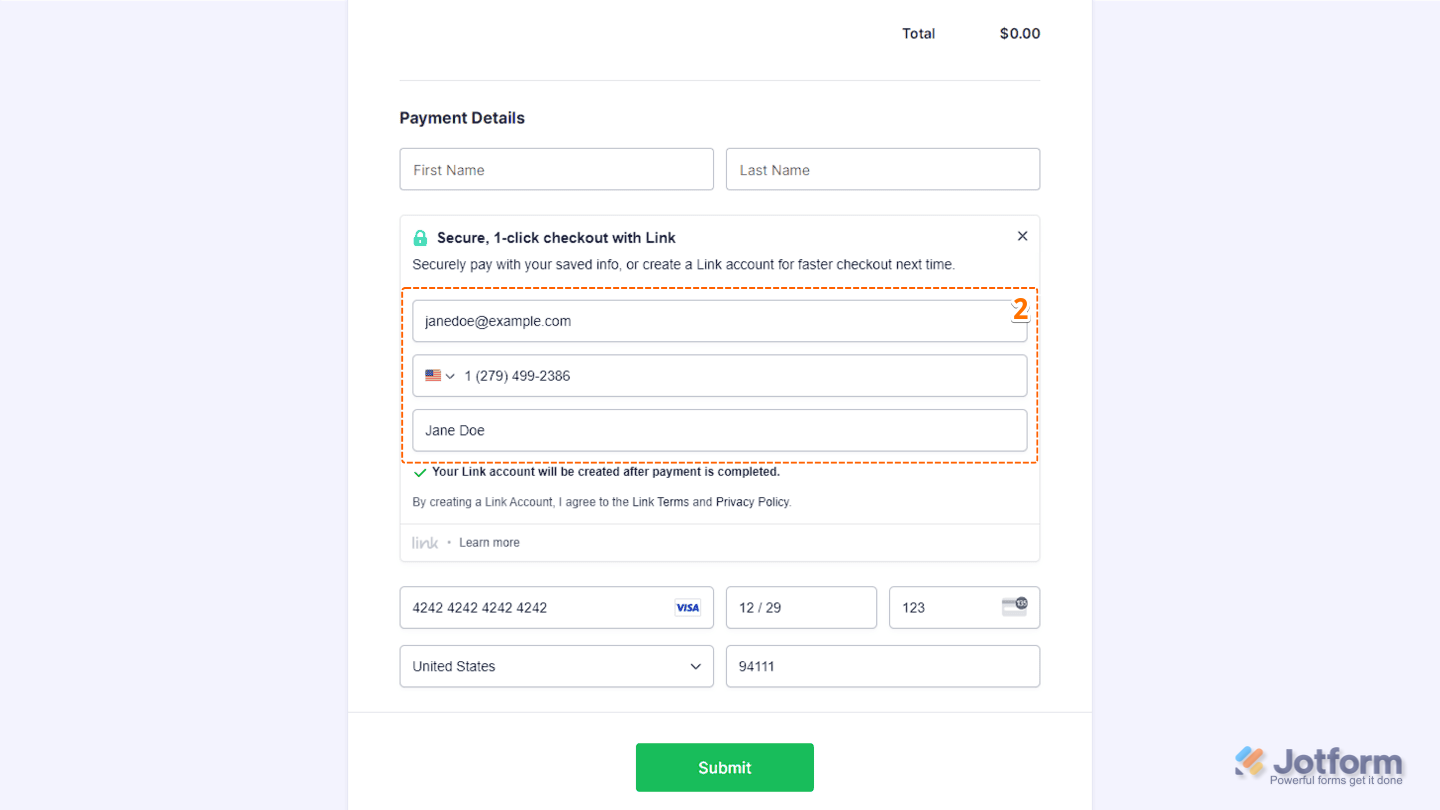
- If you’re already registered with Link, you’ll be asked to verify your account via phone (default) or email.
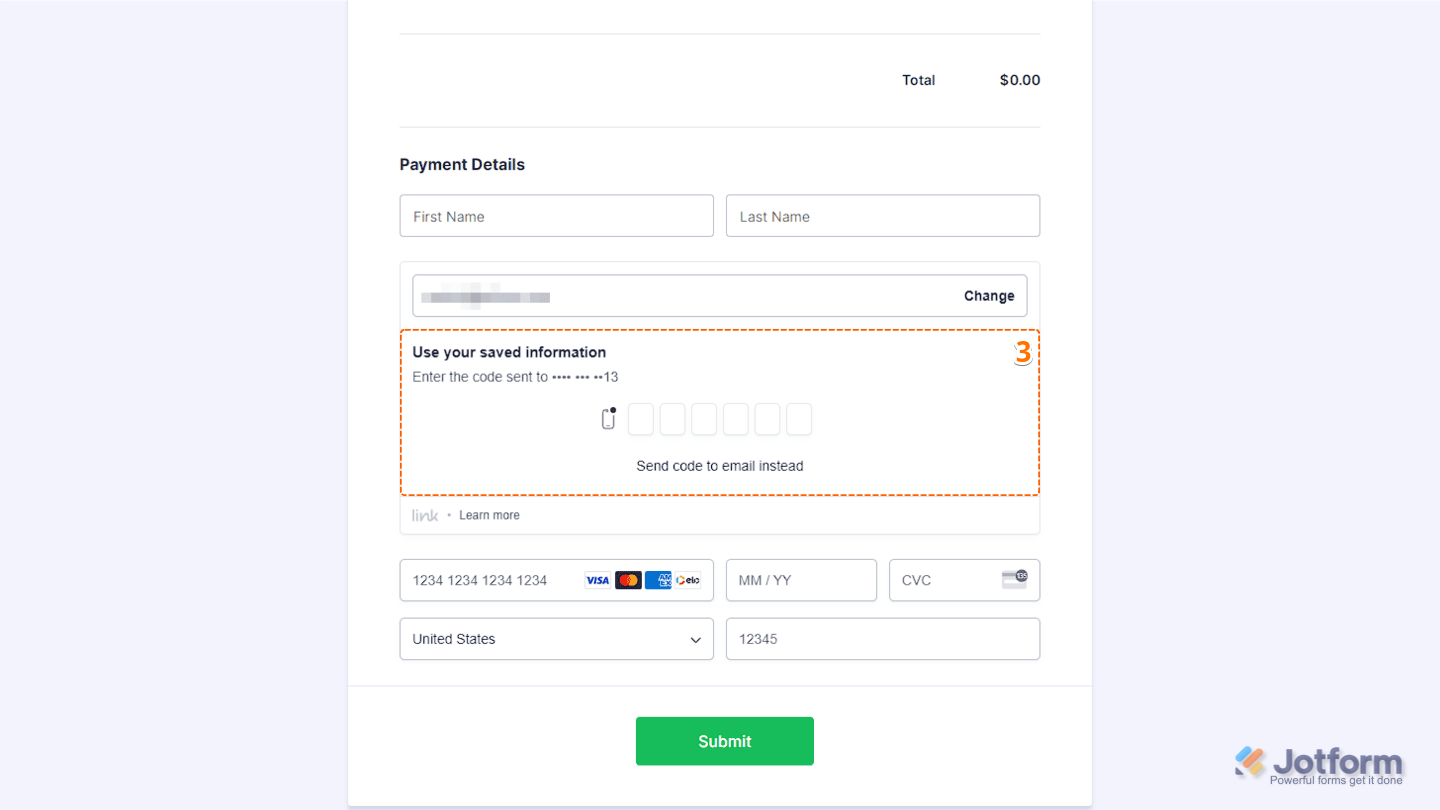
- After verifying your Link account, your default payment method will appear. Now, click on Submit to complete your payment, and you’re done.
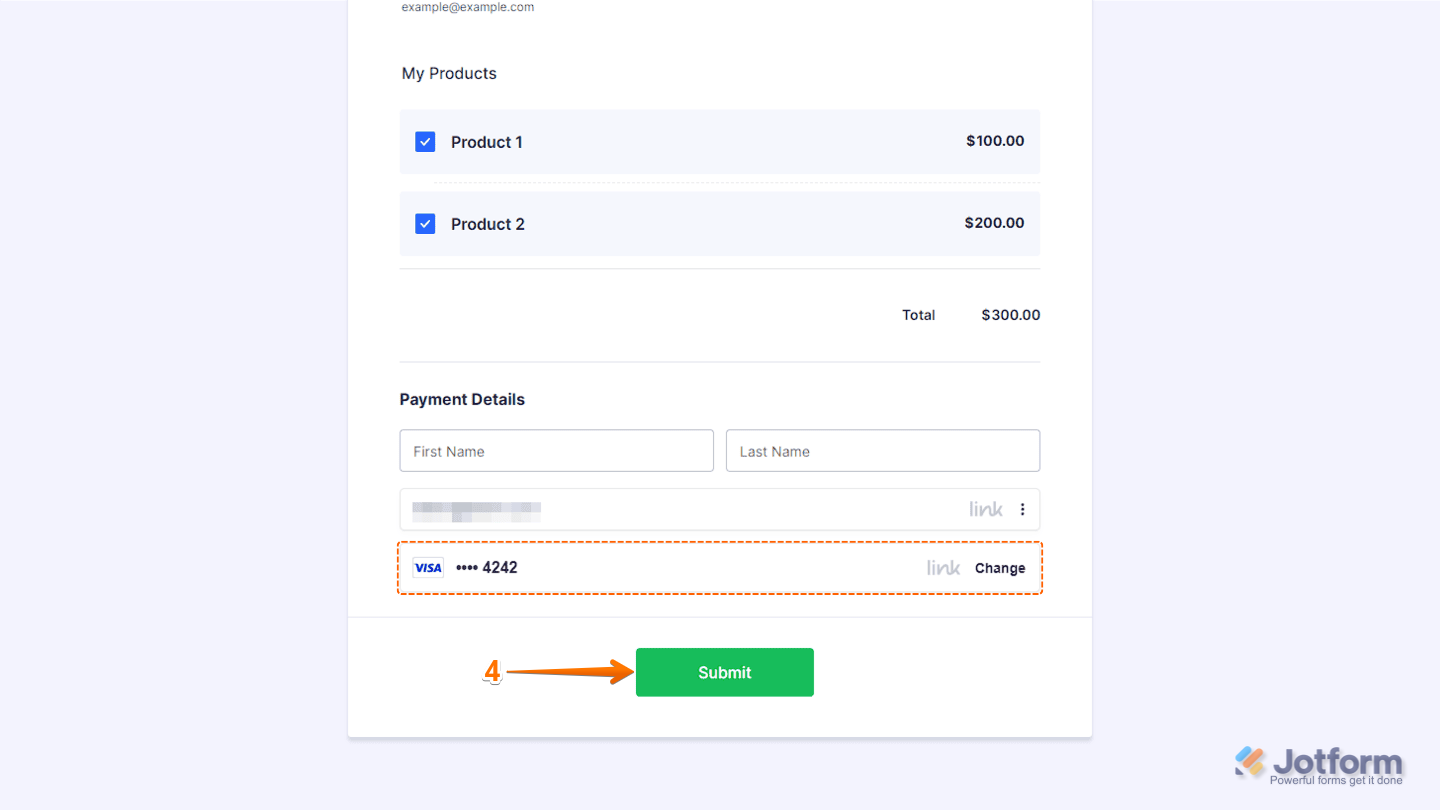
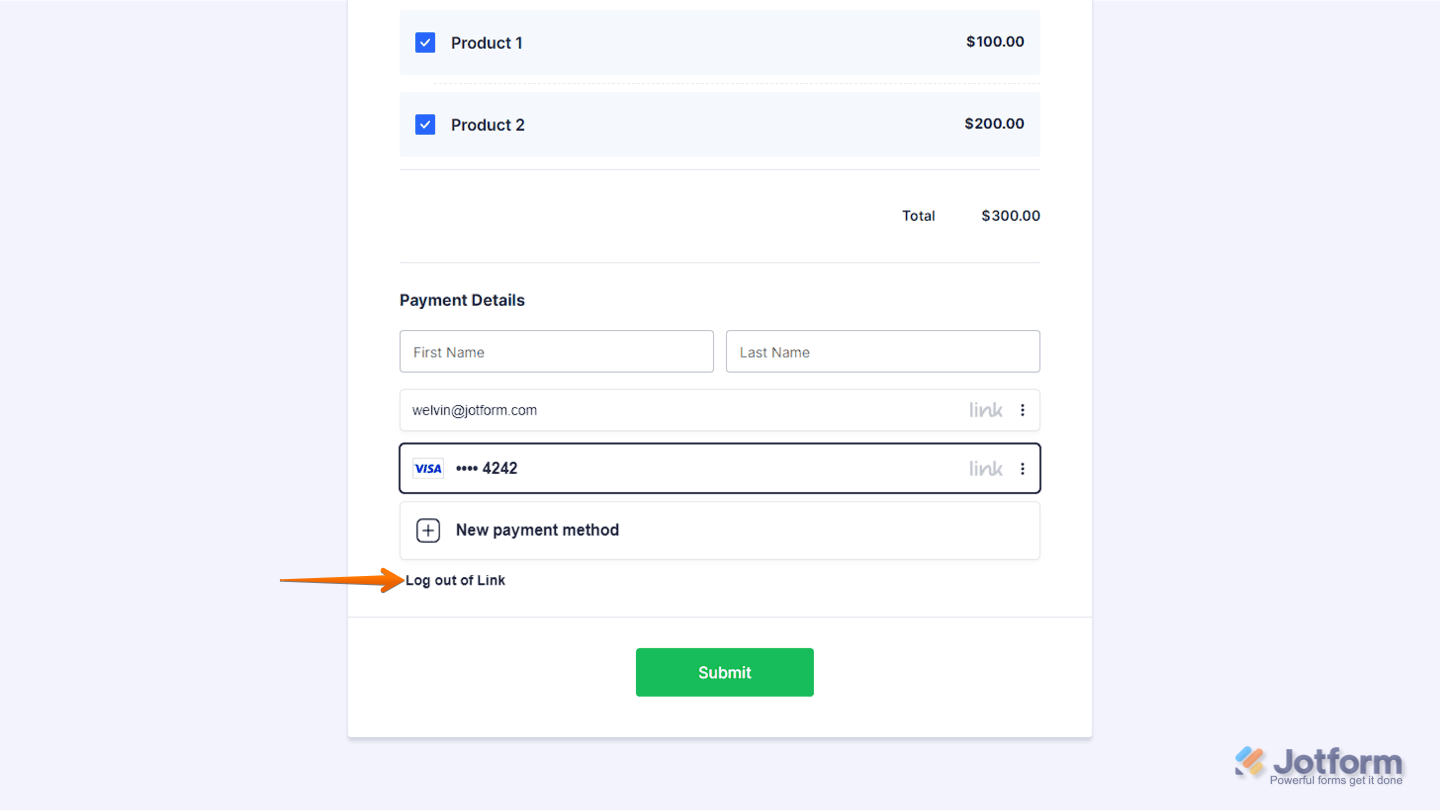
Clicking on Change on the right side of your default payment method lets you switch to another saved card or add a new payment method to your Link account.
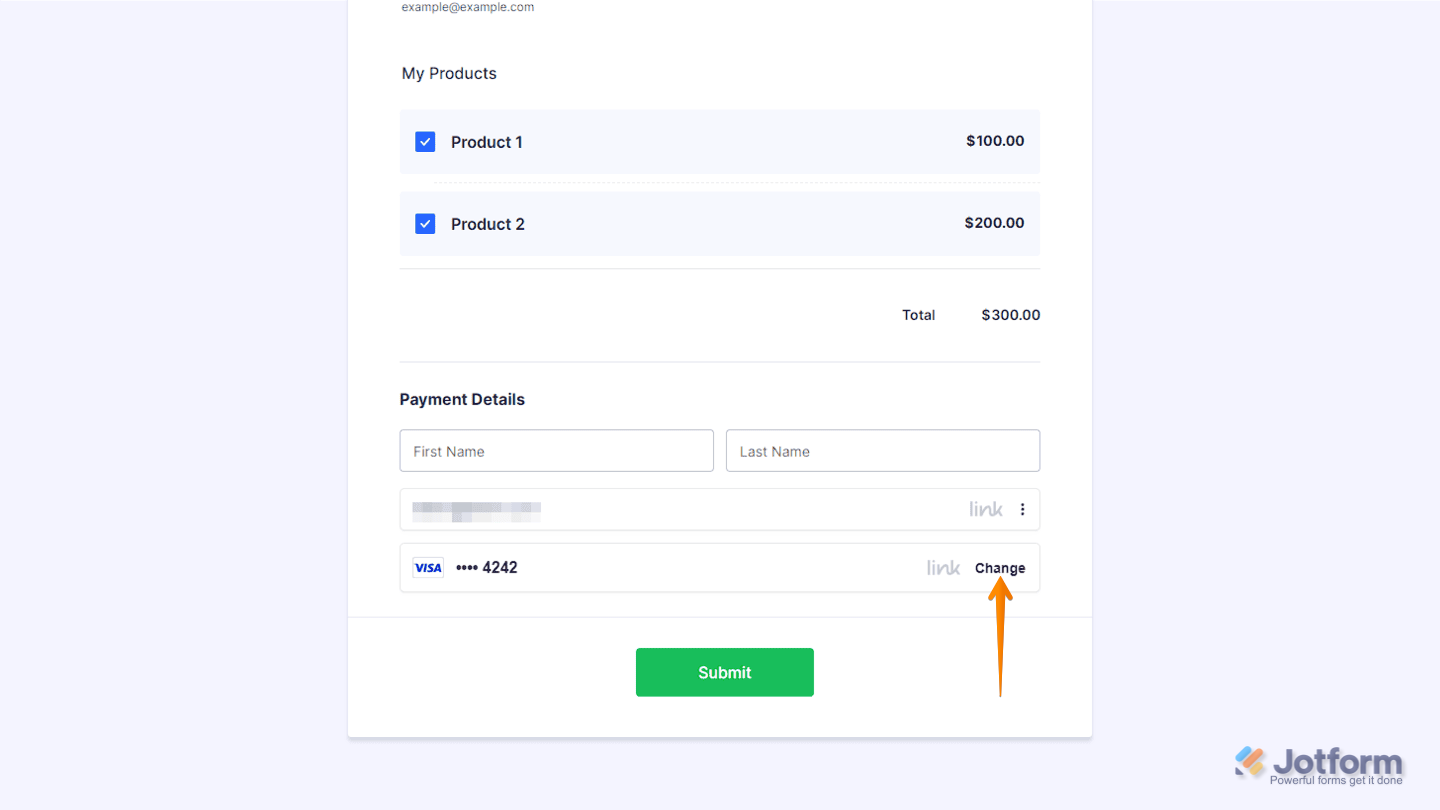
Once you click on Change, you’ll also have the option to log out.


Send Comment:
4 Comments:
April 15, 2024
How do I set up sliding scale using stripe? I use their sliding scale item now, and I like that there is a default that the visitors can edit within limits.
July 28, 2023
Sometimes these Stripe payments don't go through. The form is then saved in "Pending Payment". The issue is, nobody is notified, so we have client's that sign up, their payment doesn't go through, and then they just leave. Nobody knows to follow up with them because there is no email sent and the form is not submitted. I know how to view the pending payments, but that doesn't help me if I don't know that there is a form waiting for me there.
How can I automatically be notified if a payment fails and the form goes in hiding in the "pending payments" section?
November 4, 2021
Stripe is not connection. It's asking me to create a new Stripe account.
October 21, 2021
I am trying to create a jotform integrated with Stripe that would allow up to put in the different amount of copays and deductibles owed for medical visit fees